

Okay, I’ll admit it – I’m completely obsessed with this Red Velvet Oreo Cheesecake. It all started when I was trying to impress my dessert-loving in-laws last Christmas. I wanted something that would wow them, something that combined two of my favorite things: the rich, velvety goodness of red velvet cake and those irresistible Oreo cookies we all sneak from the pantry. What emerged from my oven that day was pure magic – a creamy, dreamy cheesecake with a chocolatey Oreo crust and just the right hint of red velvet flavor swirled throughout. The best part? It’s surprisingly simple to make, though I won’t tell your guests that when they’re raving about it!
Why You’ll Love This Red Velvet Oreo Cheesecake
Let me count the ways this cheesecake will steal your heart! First, that Oreo crust – it’s crunchy, chocolatey perfection that contrasts beautifully with the creamy filling. Trust me, you’ll catch yourself sneaking spoonfuls of the crust mixture before it even hits the pan.
The filling? Oh my. It’s got that classic New York-style cheesecake richness, but with a fun twist from the red velvet cake mix. The hint of cocoa and that gorgeous red swirl makes every bite feel like a special occasion. My neighbor actually thought I bought it from some fancy bakery!
And here’s the best part – it’s foolproof. Even if you’re new to cheesecakes, this recipe walks you through each step. No water baths, no complicated techniques. Just pure, decadent deliciousness that’ll have everyone begging for the recipe.
Ingredients for Red Velvet Oreo Cheesecake
Okay, let’s talk ingredients – and I promise, every single one of these plays a special role in making this cheesecake unforgettable. First up, the Oreos. You’ll need about 20 regular Oreos (not Double Stuf – trust me on this) crushed into fine crumbs. I use a zip-top bag and rolling pin because honestly, it’s kind of therapeutic after a long day.
For the filling, quality matters. Splurge on full-fat cream cheese – the bricks, not the tub. You’ll thank me when you taste that velvety texture. And here’s my secret weapon: that little bit of red velvet cake mix. It’s not enough to make the cheesecake taste like cake, but just enough to give it that signature flavor and gorgeous color.
- 2 cups crushed Oreo cookies (about 20 cookies)
- 1/4 cup melted butter (salted is fine – we’re not making croissants here)
- 24 oz cream cheese, softened (3 standard packages)
- 1 cup granulated sugar
- 1 tsp pure vanilla extract (imitation is a crime against cheesecakes)
- 3 large eggs, room temperature
- 1/2 cup sour cream
- 1/4 cup red velvet cake mix (just the dry powder)
- 1 cup whipped cream for topping
How to Make Red Velvet Oreo Cheesecake
Alright, let’s get baking! First things first – preheat your oven to 325°F (160°C). Trust me, starting with a properly heated oven makes all the difference with cheesecakes. While that’s warming up, let’s tackle that dreamy Oreo crust.
Take your crushed Oreos (you did save some crumbs to snack on, right?) and mix them with melted butter until they resemble wet sand. Pour this into a 9-inch springform pan and press it firmly with the bottom of a glass or measuring cup. I like to go up the sides about an inch – extra crunch in every bite! Pop this in the fridge while you make the filling.
Now for the good stuff! Beat your softened cream cheese (it should dent easily when poked) with sugar and vanilla until it’s completely smooth. No lumps allowed! This is where my stand mixer earns its keep, but a hand mixer works just fine. Add eggs one at a time, mixing well after each – this prevents cracks and ensures that silky texture we all love.
Here comes the magic – gently fold in the sour cream and red velvet cake mix. Don’t overmix! We want those beautiful red swirls, not a completely pink batter. Pour this creamy dream over your chilled crust and smooth the top with a spatula.
Bake for 50-55 minutes until the edges are set but the center still has a slight jiggle. This is crucial – it’ll keep setting as it cools. Let it chill in the fridge for at least 4 hours (overnight is even better). The wait is torture, I know, but that’s when the flavors really develop!
Right before serving, top with fluffy whipped cream and maybe some extra Oreo crumbs if you’re feeling fancy. Now try not to eat the whole thing in one sitting – I dare you!
Tips for Perfect Red Velvet Oreo Cheesecake
Listen, I’ve made this cheesecake more times than I can count, and here are my hard-won tricks for absolute perfection every time. First – and I can’t stress this enough – use full-fat cream cheese. That low-fat stuff? It’ll leave your cheesecake crying sad, crumbly tears. Trust me, we’re making dessert here, not diet food!
When pressing your Oreo crust, really put some muscle into it. I use the bottom of a sturdy glass and press until my arm gets tired – that crust shouldn’t budge when you poke it. Chill it while you make the filling too; this helps prevent soggy-bottom syndrome.
The waiting game is crucial. I know it’s tempting to slice into that gorgeous cheesecake ASAP, but let it chill overnight if you can. Those extra hours let the flavors marry beautifully and give you those clean, Instagram-worthy slices.
Pro tip? Run your knife under hot water before slicing – it glides right through without dragging the filling. And don’t forget to wipe it clean between cuts!
Storage and Reheating Instructions
Here’s the beautiful thing about this cheesecake – it actually gets better after a day in the fridge! Just cover it tightly with plastic wrap (press it right against the surface to prevent drying) and it’ll stay dreamy for 4-5 days. Serve chilled straight from the fridge – no reheating needed. Though I won’t judge if you sneak a slice for breakfast!
Ingredient Notes and Substitutions
Let’s talk ingredient swaps – because sometimes you’re staring at an empty fridge at 10 PM with a cheesecake craving! First, those Oreos: Golden Oreos make a fantastic twist if you want a lighter crust. For gluten-free folks, gluten-free chocolate sandwich cookies work beautifully (just check they’re similar in size to Oreos).
Now, about the cream cheese – yes, you can use low-fat in a pinch, but expect a slightly grainier texture. If you’re out of sour cream, Greek yogurt makes a decent substitute. And that red velvet cake mix? In emergencies, you can use 2 tbsp cocoa powder + 1/2 tsp vinegar + red food coloring, but the cake mix really gives that signature flavor.
Just remember – every substitution changes the final product a bit. My advice? Make it as written first, then get creative!
Nutritional Information
Now, I’m no nutritionist, but here’s the scoop on what’s in each slice of this heavenly cheesecake. A typical serving (about 1/12th of the cake) comes in around 450 calories – totally worth it if you ask me! These numbers are just estimates though, since actual counts can vary based on your specific ingredients and brands. The full-fat cream cheese and Oreos bring most of the richness, while that little bit of red velvet cake mix adds some extra carbs and sugar. My advice? Enjoy every bite mindfully, then go for a walk if you’re feeling guilty!
Frequently Asked Questions
Can I use a different cake mix flavor?
Absolutely! While red velvet gives that signature look and subtle cocoa flavor, you can experiment with other cake mixes. Chocolate works wonderfully, and I’ve had great results with funfetti for birthday parties. Just keep it to 1/4 cup dry mix – any more and it’ll start tasting more like cake than cheesecake.
How long does it really need to chill?
I know four hours seems like forever when you’re craving cheesecake, but it’s worth the wait! The minimum is 4 hours for proper setting, but overnight is ideal. That’s when the red velvet flavor really develops and the texture becomes perfectly creamy. If you cut it too soon, it’ll still taste amazing – just be ready for some messy slices!
Can I freeze this cheesecake?
You bet! Wrap individual slices tightly in plastic wrap, then foil, and freeze for up to 3 months. Thaw overnight in the fridge when cravings strike. The texture stays surprisingly creamy – just add fresh whipped cream before serving.
Why did my cheesecake crack?
Don’t panic! Cracks happen if you overmix the batter or bake too long. Here’s my trick: when the edges look set but the center still jiggles slightly, turn off the oven and leave the door cracked for an hour. The slow cooling helps prevent cracks. But hey – cracks just mean more room for extra whipped cream!
Share Your Red Velvet Oreo Cheesecake Experience
I’d love to hear how your cheesecake turned out! Did you add any fun twists? Maybe some extra Oreo chunks in the filling or a drizzle of chocolate sauce? Drop a comment below with your results – or better yet, snap a photo and tag me on Instagram. There’s nothing I love more than seeing your delicious creations!
Print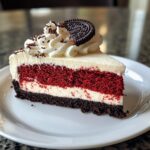
Irresistible Red Velvet Oreo Cheesecake in 5 Easy Steps
- Total Time: 5 hours 15 minutes
- Yield: 12 servings 1x
- Diet: Vegetarian
Description
A rich and creamy cheesecake with layers of red velvet cake and Oreo cookies, topped with whipped cream.
Ingredients
- 2 cups crushed Oreo cookies
- 1/4 cup melted butter
- 24 oz cream cheese, softened
- 1 cup sugar
- 1 tsp vanilla extract
- 3 eggs
- 1/2 cup sour cream
- 1/4 cup red velvet cake mix
- 1 cup whipped cream
Instructions
- Preheat oven to 325°F (160°C).
- Mix crushed Oreos and melted butter, press into a springform pan for the crust.
- Beat cream cheese, sugar, and vanilla until smooth.
- Add eggs one at a time, mixing well after each.
- Stir in sour cream and red velvet cake mix until combined.
- Pour batter over the crust and bake for 50-55 minutes.
- Let cool, then refrigerate for at least 4 hours.
- Top with whipped cream before serving.
Notes
- Use full-fat cream cheese for best texture.
- Chill cheesecake thoroughly before slicing.
- Store leftovers in the refrigerator.
- Prep Time: 20 minutes
- Cook Time: 55 minutes
- Category: Dessert
- Method: Baking
- Cuisine: American
Nutrition
- Serving Size: 1 slice
- Calories: 450
- Sugar: 30g
- Sodium: 300mg
- Fat: 28g
- Saturated Fat: 15g
- Unsaturated Fat: 10g
- Trans Fat: 0g
- Carbohydrates: 45g
- Fiber: 1g
- Protein: 6g
- Cholesterol: 120mg
Keywords: red velvet, Oreo, cheesecake, dessert, baking


