

Vla: The Secret to a Perfect Dutch Treat in Just 35 Minutes
Vla, a classic Dutch custard, is surprisingly easy to make at home. Imagine serving a creamy, rich dessert that’s both comforting and impressive. Have you ever wished for a simple yet elegant treat that everyone will adore?
This homemade vla is a smooth, silky delight with a subtle sweetness. The warm vanilla aroma fills your kitchen as it simmers on the stove. The custard coats your tongue with its velvety texture, leaving a lingering taste of pure indulgence. Its pale yellow color hints at the richness within.
Vla offers several health benefits, primarily due to its dairy base. Milk is a great source of calcium, essential for strong bones and teeth. In addition, it provides protein, which is vital for muscle repair and growth. Moreover, milk contains Vitamin D, which aids in calcium absorption and supports immune function.
Furthermore, milk is a good source of potassium, which helps regulate blood pressure. The presence of riboflavin (Vitamin B2) contributes to energy production. A lesser-known benefit is that dairy consumption can contribute to a healthy gut microbiome, thanks to certain beneficial bacteria. As a result, incorporating vla into your diet, in moderation, can be a tasty way to boost your intake of these essential nutrients.
What sets this vla recipe apart is its simplicity and authenticity. Many recipes use cornstarch as a thickener, but this version relies on a slow, careful cooking process to achieve the perfect consistency. This traditional method results in a smoother, more luxurious texture. Consequently, you’ll taste the true essence of Dutch custard.
This recipe has been a family favorite for generations, passed down through countless Sunday dinners. It’s beginner-friendly, making it accessible to anyone who wants to try their hand at Dutch cuisine. Moreover, it’s perfect for impressing guests or simply enjoying a cozy night in. Best of all, it’s easily adaptable to different flavor preferences.
This vla recipe requires just 10 minutes of prep time and 25 minutes of cook time, yielding approximately 4 servings. It’s a beginner-level recipe, perfect for weeknight desserts or impressing guests. It’s especially perfect for a quick after-dinner treat or a comforting snack.
What is Vla?
Vla is a traditional Dutch custard dessert. It is similar to crème anglaise but typically thicker. Vla is usually made with milk, sugar, and vanilla, although other flavors are also popular. It is a staple in Dutch households and enjoyed by people of all ages.
Why You Will Love This Recipe
- The texture is incredibly smooth and creamy, melting in your mouth.
- The vanilla flavor is rich and comforting, perfect for a cozy treat.
- It’s surprisingly easy to make at home with just a few simple ingredients.
- It’s a unique and authentic Dutch dessert that will impress your friends and family.
- It can be easily customized with different flavors and toppings.
Ingredients You Need
- Whole Milk: Provides the base for the custard and contributes to its creamy texture.
- Sugar: Adds sweetness and helps to thicken the custard.
- Egg Yolks: Enriches the custard and provides a smooth, velvety consistency.
- Vanilla Extract: Infuses the vla with a classic, comforting flavor.
- Pinch of Salt: Enhances the sweetness and balances the flavors.
How to Make Vla Step by Step
- In a medium saucepan, whisk together the milk, sugar, and salt.
- Place the saucepan over medium heat and bring the mixture to a simmer, stirring occasionally to prevent scorching.
- In a separate bowl, whisk the egg yolks until light and pale. This will ensure they incorporate smoothly into the milk mixture.
- Slowly temper the egg yolks by drizzling a small amount of the hot milk mixture into the bowl while whisking constantly. This prevents the eggs from scrambling.
Pro Tip: Tempering the eggs gradually is crucial for achieving a smooth, lump-free vla. Be patient and whisk continuously!
- Pour the tempered egg yolk mixture back into the saucepan with the remaining milk.
- Cook over low heat, stirring constantly with a wooden spoon, until the custard thickens enough to coat the back of the spoon. This should take about 10-15 minutes. Do not boil!
- Remove the saucepan from the heat and stir in the vanilla extract.
- Strain the vla through a fine-mesh sieve into a clean bowl to remove any lumps.
- Cover the surface of the vla with plastic wrap to prevent a skin from forming. Chill in the refrigerator for at least 2 hours before serving.
Expert Tips for Best Results
- Use a heavy-bottomed saucepan to prevent scorching and ensure even heating.
- Stir the custard constantly while it’s cooking to prevent lumps from forming.
- Cook the custard over low heat to avoid curdling the eggs.
- Do not boil the custard, as this will cause it to separate.
- Strain the vla through a fine-mesh sieve for an ultra-smooth texture.
- Chill the vla thoroughly before serving to allow it to thicken and develop its flavor.
Variations and Substitutions
- Chocolate Vla: Add cocoa powder (about 2-3 tablespoons) to the milk mixture for a rich chocolate flavor.
- Caramel Vla: Stir in caramel sauce after cooking for a decadent caramel twist.
- Dairy-Free Vla: Use almond milk or soy milk instead of cow’s milk for a dairy-free version. Note that the texture may be slightly different.
- Seasonal Fruit Vla: Swirl in fresh berries or fruit compote before chilling for a fruity variation.
How to Serve and Store
Serving suggestions: Serve vla chilled in individual bowls or glasses. Garnish with fresh fruit, whipped cream, chocolate shavings, or a sprinkle of cinnamon. It’s also frequently served with cookies or cake.
Storage: Store leftover vla in an airtight container in the refrigerator for up to 3 days.
Freezing: Freezing is not recommended, as the texture may change upon thawing.
Reheating: Reheating is not recommended. Enjoy vla chilled for the best texture and flavor.
Frequently Asked Questions
Can I use a different type of milk?
Yes, you can use other types of milk. However, whole milk will give the richest and creamiest result. Skim milk will result in a thinner vla.
Can I reduce the amount of sugar?
Yes, you can adjust the sugar to your preference. However, keep in mind that sugar also contributes to the texture of the vla.
What if my vla is too thin?
Continue cooking the vla over low heat, stirring constantly, until it thickens. Be careful not to boil it.
Can I make vla without egg yolks?
No, egg yolks are essential for the rich texture and flavor of traditional vla. Substituting them will significantly alter the recipe.
Why did my vla curdle?
Curdling usually happens when the vla is cooked over too high heat. Be sure to cook it over low heat and stir constantly.
Can I add other flavor extracts?
Yes, feel free to experiment with other extracts like almond, lemon, or orange to customize the flavor of your vla.
Vla is a delightful Dutch treat that’s surprisingly simple to make at home. It offers a creamy, comforting experience and is sure to impress. Try this recipe today and leave a comment below!
Print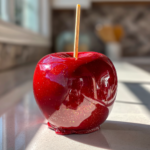
Vla: The Secret to a Perfect Dutch Treat in Just 35 Minutes
Description
Ce recept voor appel met een harde suikerlaag geeft je een perfect glanzende, harde suikercoating die bij de eerste beet schoon breekt – elke keer weer. Gemaakt met slechts 5 ingrediënten uit de voorraadkast en klaar in 30 minuten, brengen deze klassieke zelfgemaakte appels herinneringen terug aan elk carnaval en Halloween dat je hebt. Geen plakkerige coating, geen bewolkte afwerking, geen giswerk – gewoon het echte werk, rechtstreeks in je keuken gemaakt. Het geheim is één getal: 149°C. Bereik die temperatuur en je kunt niet falen.
Ingredients
- 6 middelgrote appels, stevige soort – Granny Smith (zuur) of Fuji (zoet) sterk aanbevolen
- 400 g kristalsuiker
- 120 ml lichte glucosestroop
- 180 ml water
- ½ theelepel rode gelvoedselkleurstof (gel geeft een diepere kleur dan vloeistof)
- ½ theelepel kaneelextract of smaakolie (optioneel)
- 6 houten appelstokjes of stevige lollystokjes
- Anti-aanbakspray
- Bakpapier of siliconen bakmat
Instructions
- Zet je werkplek klaar voordat je begint: bekleed een bakplaat met bakpapier en bestrijk deze licht met anti-aanbakspray. Houd je appels met stokjes klaar en binnen handbereik. Zodra de suiker de temperatuur bereikt, moet je snel handelen – voorbereiding is alles.
- Verwijder alle was van je appels. In de winkel gekochte appels hebben een voedselveilige waslaag die voorkomt dat de snoepjes blijven plakken en bubbels veroorzaakt. Dompel elke appel 5 seconden in kokend water en schrob ze droog met een ruwe theedoek. Steek een houten stok stevig in het steluiteinde van elke appel en duw hem minstens halverwege door. Zet opzij op je voorbereide bakplaat.
- Combineer de suiker, glucosestroop en het water in een middelgrote pan met een zware bodem. Roer voorzichtig tot de suiker bevochtigd is. Klem een snoepthermometer aan de zijkant van de pan en zorg ervoor dat de punt ondergedompeld is in het mengsel, maar de bodem van de pan niet raakt – een onnauwkeurige meting zal de coating verpesten.
- Zet de pan op middelhoog vuur. Breng het mengsel aan de kook zonder te roeren. Zodra het kookt, gebruik je een natte borstel om eventuele suikerkristallen die aan de zijkanten van de pan kleven weg te vegen – eventuele kristallen die terugvallen kunnen de hele batch kristalliseren.
- Blijf koken, zonder te roeren, tot de snoepthermometer tussen 149°C en 154°C aangeeft – dit is het harde kraakstadium. Dit duurt ongeveer 15 tot 20 minuten. De temperatuur zal eerst langzaam stijgen en dan aan het einde dramatisch versnellen. Loop niet weg tijdens de laatste 5 minuten.
- Haal de pan onmiddellijk van het vuur zodra hij 149°C bereikt. Roer de gelvoedselkleurstof en het kaneelextract erdoor, indien gebruikt. Roer niet te veel – een paar zachte slagen zijn voldoende. Wacht nu. Laat alle bubbels volledig verdwijnen, ongeveer 1 tot 2 minuten. Dippen in een bruisende siroop laat een getextureerde, ongelijkmatige coating op je appels achter.
- Kantel de pan naar één kant zodat de siroop diep in één hoek verzamelt – dit maakt een volledige bedekking gemakkelijker. Werk één appel tegelijk en doop en roteer elke appel om volledig te bedekken, waarbij je het overtollige 3 tot 4 seconden terug in de pan laat druppelen. Plaats elke gecoate appel met het stokje naar boven op de voorbereide bakplaat. Raak de appels niet aan en verplaats ze niet terwijl ze uitharden. Laat volledig afkoelen op kamertemperatuur gedurende ten minste 20 minuten voor het serveren. De coating zal uitharden tot een glasachtige afwerking.
Notes
- Waarom is mijn harde suikerlaag kleverig of taai? De siroop heeft geen 149°C bereikt (hard kraakstadium). Zelfs een paar graden te weinig – bij 138°C of 146°C – laat te veel water achter in de suiker, wat resulteert in een zachte, taffy-achtige textuur in plaats van een harde schaal. Gebruik altijd een gekalibreerde snoepthermometer en haal hem niet vroegtijdig van het vuur.
- Waarom is mijn harde suikerlaag troebel of vol bubbels? Je hebt gedipt voordat de bubbels volledig waren verdwenen na het toevoegen van de voedselkleurstof. Wacht altijd 1 tot 2 volle minuten nadat je het van het vuur hebt gehaald tot het oppervlak volledig stil en glanzend is voordat je gaat dippen.
- Waarom blijft de coating niet aan mijn appel plakken? Het oppervlak van de appel was nog steeds wasachtig of licht vochtig. Was en water voorkomen beide suikerhechting. Verwijder de was met een 5 seconden durende kokendwaterdip en droog vervolgens volledig af met een ruwe handdoek voordat je gaat dippen.
- Koel appels met een harde suikerlaag nooit. Koude lucht en vochtigheid zorgen ervoor dat de harde suikerlaag vocht absorbeert en kleverig wordt. Bewaar op kamertemperatuur, onbedekt of losjes verpakt, en eet binnen 1 tot 2 dagen voor de beste textuur.
- Als de siroop te veel indikt tijdens het dippen, zet de pan dan 20 tot 30 seconden terug op laag vuur om hem los te maken. Voeg geen water toe.
- Om appels met een harde suikerlaag zonder glucosestroop te maken: vervang door 1 theelepel witte azijn of vers citroensap. Dit voorkomt suikerkristallisatie op dezelfde manier als glucosestroop.
- Voor Halloween-appels met een harde suikerlaag: vervang rode gelkleurstof door zwarte, dieppaarse of bosgroene om een spookachtige, dramatische afwerking te krijgen. Zwarte voedselkleurstof werkt het beste met extra zwarte gel, niet met gewone zwarte.
- De beste dag om appels met een harde suikerlaag te maken: een koele, droge dag met een lage luchtvochtigheid. Op vochtige dagen blijft de coating plakkerig, zelfs na volledige afkoeling. Vermijd het maken van deze op regenachtige dagen of in een stomende keuken.
- De appelsoort is belangrijk: Granny Smith geeft een zuurzoet contrast dat door de suikerlaag snijdt. Fuji en Honeycrisp zijn zoeter en even stevig. Vermijd zachte soorten zoals McIntosh of Red Delicious – ze worden papperig onder de hete suiker.
Nutrition
- Serving Size: 1 appel met een harde suikerlaag
- Calories: 271
- Sugar: 65
- Sodium: 3
- Fat: 1
- Saturated Fat: 0
- Unsaturated Fat: 1
- Trans Fat: 0
- Carbohydrates: 71
- Fiber: 4
- Protein: 1
- Cholesterol: 0
Keywords: recept voor appels met een harde suikerlaag, zelfgemaakte appels met een harde suikerlaag, eenvoudig recept voor appels met een harde suikerlaag, Halloween-appels met een harde suikerlaag, appel met een harde suikerlaag zonder glucosestroop, harde kraak-appels met een harde suikerlaag, glanzende appels met een harde suikerlaag, appels met een harde suikerlaag vanaf nul, herfst-recept voor appels met een harde suikerlaag, carnaval-appels met een harde suikerlaag, hoe je appels met een harde suikerlaag maakt, tips voor appels met een harde suikerlaag, oplossing voor kleverige appels met een harde suikerlaag, beste appels voor appels met een harde suikerlaag


