
Let me tell you about the day I fell completely in love with mini lasagna cups. It was one of those crazy weeknights – kids screaming, work emails piling up, and zero energy to cook. I needed something fast, satisfying, and freezer-friendly. That’s when I discovered these little lifesavers! Mini lasagna cups are my go-to solution now whenever I need a quick dinner that feels special. They’re perfectly portioned, freeze like a dream, and reheat in minutes. Honestly, I’ll never go back to wrestling with messy lasagna pans again. These bite-sized beauties are about to become your new freezer staple too!
Why You’ll Love Mini Lasagna Cups: Ready-To-Freeze Favorites
Let me count the ways these little cups will change your meal prep game:
- Weeknight superhero: From fridge to table in 20 minutes flat – perfect for those “I can’t even” evenings
- Freezer magic: Make a double batch and stash them away – they keep beautifully for up to 3 months
- Portion perfection: No more guessing servings – each cup is just the right amount (though you’ll probably eat three!)
- Kid-approved: The fun, single-serve style makes even picky eaters gobble them up
- No-mess solution: Say goodbye to sloppy lasagna slices – these stay neatly contained
Trust me, once you try them, you’ll wonder how you ever lived without these freezer-friendly gems!
Ingredients for Mini Lasagna Cups: Ready-To-Freeze Favorites
Here’s everything you’ll need to make these adorable little lasagna cups – I promise it’s all simple stuff you probably have already! The magic is in how we put them together.
- 12 lasagna noodles (uncooked – or use no-boil for extra convenience)
- 1 lb ground beef (I sometimes use Italian sausage for extra flavor!)
- 1 cup ricotta cheese (pack it in there nice and tight)
- 1 cup shredded mozzarella (plus extra for that golden top we all love)
- 1/2 cup grated Parmesan (the good stuff, not the powder!)
- 1 egg, beaten (this binds our cheesy filling together)
- 2 cups marinara sauce (divided – we’ll use some in the layers and some for serving)
- 1 tsp garlic powder (because everything’s better with garlic)
- 1 tsp dried oregano (that classic Italian flavor)
- 1/2 tsp salt and 1/4 tsp black pepper (season to your taste, of course)
See? Nothing fancy – just good, honest ingredients that come together to make something magical. Now let’s get cooking!
Equipment You’ll Need
Before we dive in, let’s round up our kitchen helpers – nothing complicated, I promise! Here’s what you’ll want within arm’s reach:
- Standard muffin tin (this is our magic mold!)
- Large mixing bowl (for that dreamy ricotta blend)
- Skillet (to brown our beef to perfection)
- Measuring cups/spoons (eyeballing never works for me!)
- Kitchen scissors (for quick noodle trimming)
That’s it! No fancy gadgets needed – just good old-fashioned kitchen basics.
How to Make Mini Lasagna Cups: Ready-To-Freeze Favorites
Alright, let’s get these little beauties made! I’ve perfected this method through many (many) batches, and I’ll walk you through each step so your mini lasagna cups turn out perfect every time.
Step 1: Prep the Noodles
First, get that oven preheating to 375°F – this gives it time to get nice and toasty while we prep. Now, cook your lasagna noodles just until al dente (about 2 minutes less than the package says). Here’s my trick: I fish them out with tongs straight into a colander, then rinse with cold water to stop the cooking. Lay them flat on a clean towel and pat dry – this prevents sticking when we cut them. Use kitchen scissors to snip each noodle into 4 perfect little squares. They should be pliable but not mushy – that al dente bite is key!
Step 2: Cook the Filling
While the noodles dry, brown that ground beef in your skillet over medium heat. I like to really get in there with my wooden spoon, breaking it up into tiny crumbles. When there’s no pink left, here comes the important part – tilt that pan and spoon out ALL the excess fat (I usually pour it into an old can). That grease will make your cups soggy if you leave it in! Stir in 1 cup of marinara just to coat the beef, then take it off the heat.
Step 3: Layer the Cups
Time for assembly! Spray your muffin tin generously – trust me, you’ll thank me later. Take a noodle square and gently press it into each cup, forming a little nest. Here’s how I layer:
- Small spoonful of meat sauce
- Dollop of ricotta mixture (about 1 tsp)
- Pinch of mozzarella
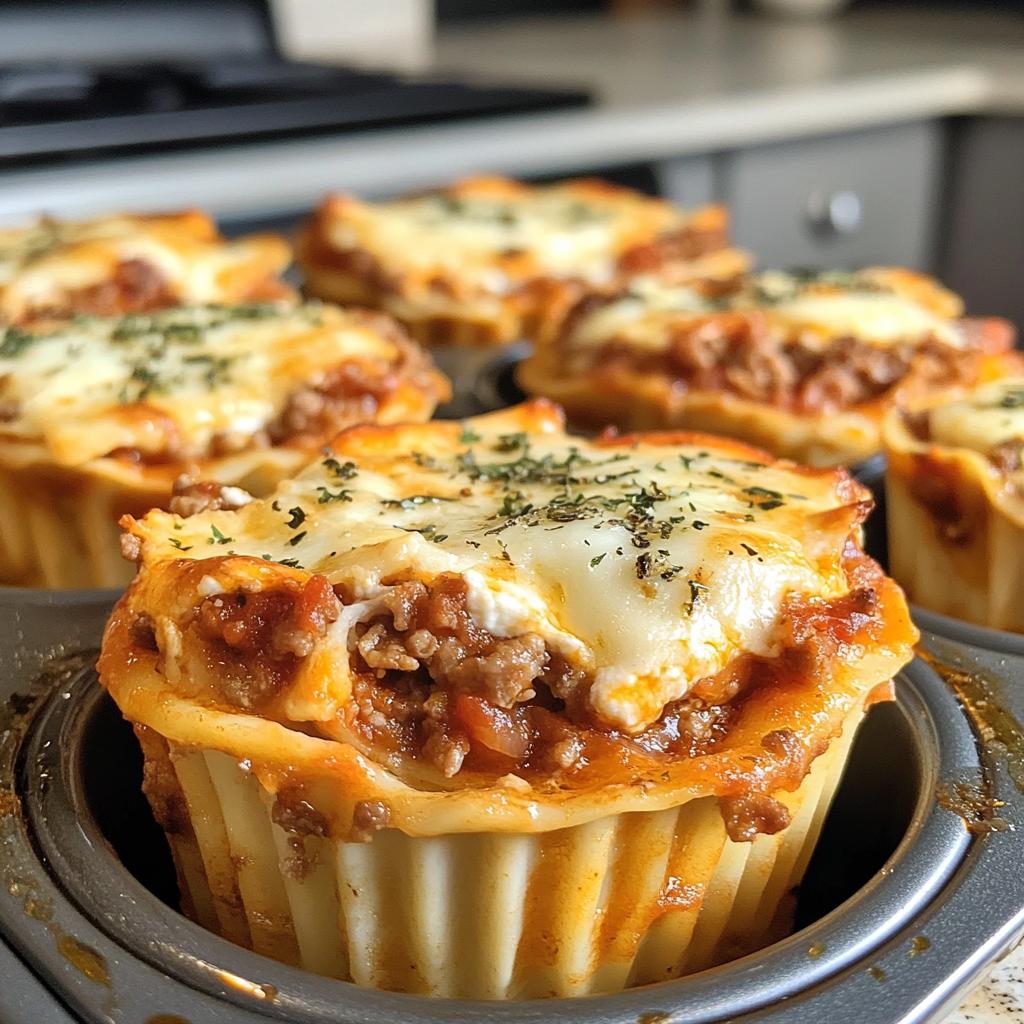
Then repeat! Top with one more noodle square and press lightly. Don’t overstuff – leave about 1/4 inch at the top so they don’t bubble over. Finish each with a generous sprinkle of mozzarella (because cheesy tops are the best part!).
Step 4: Bake and Freeze
Pop them in the oven for 15-20 minutes until the cheese is golden and bubbly. Your kitchen will smell incredible! Let them cool completely in the tin (about 15 minutes) – this helps them set so they don’t fall apart. To freeze, I line them up on a baking sheet until solid, then transfer to freezer bags. They’ll keep beautifully for up to 3 months, but I doubt they’ll last that long!
Tips for Perfect Mini Lasagna Cups: Ready-To-Freeze Favorites
After making countless batches of these mini lasagna cups, I’ve picked up some tricks that make them foolproof every time. Here are my can’t-live-without tips:
- Grease generously: Don’t be shy with that cooking spray – get every nook of your muffin tin to prevent sticking disasters
- Noodle know-how: No-boil lasagna sheets are a total time-saver and hold their shape beautifully in the cups
- Cool completely: Let them rest in the tin for 15 minutes before removing – this keeps them from falling apart
- Freeze flat first: Place baked cups on a tray to flash-freeze individually before bagging – no more stuck-together mess!
Follow these simple tricks, and you’ll have freezer-ready mini lasagnas that look and taste like you spent hours in the kitchen!
Ingredient Substitutions
One of the best things about these mini lasagna cups is how flexible they are! Need to switch things up? Here are my favorite easy swaps that still give amazing results:
- Meat lovers: Try Italian sausage instead of beef, or mix half beef half pork for extra richness
- Lighter option: Ground turkey or chicken works beautifully – just add an extra pinch of Italian seasoning
- Vegetarian twist: Swap the meat for sautéed mushrooms and spinach (squeeze out excess moisture first!)
- Dairy-free: Vegan ricotta and mozzarella alternatives have come a long way – my plant-based friends love them
- Sauce switch: Alfredo or pesto make fun variations when you’re feeling fancy
The possibilities are endless – make them your own!
Serving Suggestions
Oh, let me tell you how I love to serve these mini lasagna cups – it’s all about creating that perfect Italian bistro vibe at home! My go-to is a crisp Caesar salad (the kids go crazy for the croutons) and garlic bread so buttery it leaves shiny fingerprints on the plate. For busy weeknights, I’ll just microwave a few frozen cups alongside some roasted veggies – instant balanced meal! These little guys also make fantastic party appetizers; just pop them on a platter with marinara for dipping. Honestly, they’re so versatile, you can’t go wrong!
Storing and Reheating Mini Lasagna Cups: Ready-To-Freeze Favorites
Here’s the beautiful thing about these mini lasagna cups – they actually freeze better than regular lasagna! After baking, I let them cool completely (impatient nibbling leads to heartbreak – trust me). Then I line them up on a baking sheet to “flash freeze” for about an hour. This keeps them from sticking together later. Once solid, I tuck them into airtight containers with parchment between layers. They’ll keep happily in your freezer for up to 3 months – though mine never last that long!
When hunger strikes, you’ve got options:
- Oven method: 375°F for 15-20 minutes from frozen (I like to add a tiny splash of water to prevent drying)
- Microwave magic: 2-3 minutes on high, covered with a damp paper towel
Pro tip: Keep some extra marinara on hand for reheating – a quick drizzle brings them right back to life!
Nutrition Information
Now let’s talk numbers – because we all want to know what we’re putting into our bodies, right? Keep in mind these are estimates that can vary based on your specific ingredients (a little extra cheese here, leaner beef there – you know how it goes!). Here’s the breakdown per mini lasagna cup:
- Calories: 220
- Protein: 14g (perfect post-workout snack!)
- Fat: 10g
- Carbs: 18g
- Fiber: 1g
Not too shabby for something that tastes this indulgent! Remember, these are approximate – your exact counts will depend on brands and any tweaks you make to the recipe. But honestly? Sometimes a little cheesy goodness is worth every delicious calorie!
FAQs About Mini Lasagna Cups: Ready-To-Freeze Favorites
I’ve gotten so many questions about these mini lasagna cups over the years – let me share the answers to the ones I hear most often!
Can I use cottage cheese instead of ricotta?
Absolutely! I do this all the time when I’m out of ricotta. Just blend the cottage cheese first for smoother texture (I use my immersion blender). The taste is nearly identical, and my kids never notice the difference!
How do I prevent soggy cups?
The key is draining ALL the fat from your meat and patting those noodles dry. Also, don’t skip the cooling step before freezing – that 15-minute rest lets everything set up perfectly. My grandma’s trick? A sprinkle of breadcrumbs between layers to absorb extra moisture!
Can I make these ahead and refrigerate instead of freeze?
You bet! They’ll keep beautifully in the fridge for 3-4 days. Just reheat at 350°F for about 10 minutes when ready to eat. Honestly though, they freeze so well, I always make extra for the freezer!
Why do my cups stick to the pan?
Oh honey, we’ve all been there! My foolproof method is to spray the tin, then use a butter knife to gently loosen the edges after baking. Let them sit for a full 15 minutes before removing – patience is your friend here!
Can I use different pasta shapes?
Get creative! Wonton wrappers make adorable “cup” shells, and jumbo pasta shells work great too. Just adjust baking times accordingly. The beauty of this recipe is how adaptable it is!
Share Your Mini Lasagna Cups!
I’d love to hear how your mini lasagna cups turned out! Did you add any special twists? Which freezing method worked best for you? Drop your experiences in the comments below – your tips might help another busy cook discover their new favorite freezer meal!
Print
21 Flavorful Mini Lasagna Cups: Freezer Hero Dishes You’ll Crave
- Total Time: 40 mins
- Yield: 12 cups 1x
- Diet: Low Lactose
Description
Mini lasagna cups are a fun and easy twist on traditional lasagna. Perfect for meal prep, these bite-sized portions are freezer-friendly and quick to reheat.
Ingredients
- 12 lasagna noodles
- 1 lb ground beef
- 1 cup ricotta cheese
- 1 cup shredded mozzarella
- 1/2 cup grated Parmesan
- 1 egg
- 2 cups marinara sauce
- 1 tsp garlic powder
- 1 tsp dried oregano
- 1/2 tsp salt
- 1/4 tsp black pepper
Instructions
- Preheat oven to 375°F. Cook lasagna noodles until al dente, then cut into squares.
- Brown ground beef in a pan. Drain excess fat.
- Mix ricotta, egg, Parmesan, garlic powder, oregano, salt, and pepper in a bowl.
- Press noodle squares into muffin tin cups to form a base.
- Layer beef, ricotta mix, and mozzarella in each cup. Repeat layers.
- Bake for 15-20 minutes until cheese melts and edges brown.
- Let cool, then freeze in an airtight container.
Notes
- Use no-boil lasagna sheets for quicker prep.
- Substitute ground turkey for a lighter option.
- Thaw overnight before reheating in the oven or microwave.
- Prep Time: 20 mins
- Cook Time: 20 mins
- Category: Main Dish
- Method: Baking
- Cuisine: Italian
Nutrition
- Serving Size: 1 cup
- Calories: 220
- Sugar: 3g
- Sodium: 380mg
- Fat: 10g
- Saturated Fat: 4.5g
- Unsaturated Fat: 4g
- Trans Fat: 0g
- Carbohydrates: 18g
- Fiber: 1g
- Protein: 14g
- Cholesterol: 50mg
Keywords: mini lasagna, freezer meal, bite-sized lasagna, meal prep


