

You know that moment when you take a bite of something so divine, you actually pause mid-chew? That’s exactly what happened when I first tried this Heavenly Black Forest Cheesecake Delight at a tiny café in Berlin. The rich chocolate cheesecake paired with those tart, juicy cherries—oh my. I knew right then I had to recreate it at home.
After years of tweaking (and plenty of “research” bites), I’ve landed on the perfect balance: a velvety chocolate cheesecake that isn’t too sweet, nestled in a buttery cookie crust, topped with just enough cherry filling to make your taste buds sing. The secret? Using real cocoa powder (none of that weak sauce!) and letting the cream cheese truly soften—no shortcuts here.
What makes this recipe special? It’s that magical combo of textures and flavors. The smooth cheesecake melts against the crisp crust, while the cherries cut through the richness like little bursts of joy. Trust me, this isn’t just dessert—it’s an experience. And the best part? It’s easier to make than you’d think for something so showstopping.
Why You’ll Love This Heavenly Black Forest Cheesecake Delight
This isn’t just another cheesecake—it’s pure magic in dessert form, and here’s why:
- Impresses effortlessly: That gorgeous chocolate-cherry swirl makes everyone think you slaved for hours. (Our little secret? It’s surprisingly simple.)
- Flexible for any occasion: Need a no-bake version? Just skip the oven time and let it set overnight. Perfect for summer when you don’t want to heat the kitchen.
- Crowd-pleasing flavors: Even picky eaters can’t resist the classic chocolate-cherry combo. I’ve seen grown adults lick their plates clean at potlucks!
- Forgiving with substitutions: Out of sour cream? Greek yogurt works beautifully. Want extra boozy cherries? A splash of kirsch takes it next-level.
- Luxurious texture: The velvety smooth filling paired with that crisp cookie crust? Absolute perfection. One bite and you’ll understand why this is my most-requested dessert.
Ingredients for Heavenly Black Forest Cheesecake Delight
Gather these goodies—I promise every single one plays a crucial role in creating that perfect bite. And hey, no judgment if you sneak a spoonful of cherry filling while prepping. I do it every time!
- 2 cups chocolate cookie crumbs – Go for a fine grind (I use a food processor) so your crust holds together beautifully. Oreos work great, but any chocolate sandwich cookie or even chocolate graham crackers will do.
- 1/2 cup melted butter – The glue that holds our crust together! I prefer unsalted so I can control the saltiness, but salted works in a pinch—just skip any extra salt in the recipe.
- 24 oz cream cheese, softened – This is non-negotiable! Take it out 2-3 hours before baking. Room temp cream cheese mixes smoother—no one wants lumpy cheesecake. (Pro tip: If you forgot to soften it, microwave for 15-second bursts at 50% power.)
- 1 cup granulated sugar – Regular white sugar works best here. I’ve tried brown sugar before and while tasty, it muddies that beautiful cocoa color.
- 3 large eggs – Always large eggs for consistency. Crack them into a separate bowl first—nothing ruins a batch like shell fragments!
- 1 tsp vanilla extract – The good stuff, please! Imitation vanilla just doesn’t give that warm depth of flavor.
- 1 cup sour cream – Full-fat is ideal for that velvety texture. See that layer floating on top when you open the container? That’s liquid gold—stir it back in!
- 1/2 cup cocoa powder – Dutch-processed gives the deepest chocolate flavor, but regular unsweetened cocoa works too. Just don’t use hot chocolate mix—trust me, I learned that the hard way.
- 1 cup cherry pie filling – Look for one with plump, whole cherries. Drain off excess syrup if it looks watery—we want flavor, not a soggy cheesecake!
- Whipped cream for topping – Homemade is dreamy, but a good quality canned version works when you’re short on time. No shame in shortcuts!
See? Nothing too fancy, just quality ingredients treated right. Now let’s turn these into something magical!
Equipment You’ll Need
Now, let’s talk tools! Don’t worry—you don’t need fancy gadgets to make this Heavenly Black Forest Cheesecake Delight shine. Here’s what I always grab from my kitchen:
- 9-inch springform pan – The hero of cheesecake baking! That removable collar is a game-changer for serving. If yours tends to leak (we’ve all been there), wrap the bottom in foil before adding the crust.
- Electric mixer – A hand mixer works great, but my stand mixer is my partner in crime for cheesecake. Just don’t overmix—we want creamy, not fluffy!
- Silicone spatula – For scraping every last bit of that luscious batter into the pan. Bonus: It’s also perfect for sneaking a taste test.
- Measuring cups and spoons – Cheesecake is science meeting art, so measure carefully. My grandma’s old metal cups are my go-to—they’ve never steered me wrong.
- Mixing bowls – One for the crust, one for the filling. I like glass so I can see when everything’s fully incorporated.
Nice-to-haves if you’re feeling fancy:
- Piping bag with star tip – For those gorgeous whipped cream swirls. But a spoon works just fine if you’re going for rustic charm.
- Fine mesh strainer – If you want ultra-smooth cocoa powder without any lumps.
- Cookie scoop – Makes portioning the crust mixture super easy, though your clean hands work perfectly too.
That’s it! No specialty equipment required—just the basics you probably already have in your kitchen. Now let’s get baking!
How to Make Heavenly Black Forest Cheesecake Delight
Alright, let’s dive into the fun part! Making this cheesecake is like conducting a delicious symphony—each step builds on the last to create something magical. I’ll walk you through every move, just like I do when teaching my niece in the kitchen (though she mostly just licks the bowl).
Step 1: Prepare the Crust
First things first—that buttery, chocolatey foundation! Preheat your oven to 325°F (165°C) so it’s ready when you are. Mix your chocolate cookie crumbs with melted butter until it looks like wet sand. (If it holds together when you squeeze a handful, you’ve nailed it!)
Now, dump it all into your springform pan and press firmly—I mean business here! Use the bottom of a glass or measuring cup to really compact it. You want an even layer across the bottom and about halfway up the sides. Pro tip: If it sticks to your glass, spritz it lightly with cooking spray first. Pop this in the oven for 10 minutes to set—it’ll smell amazing already!
Step 2: Make the Cheesecake Filling
While the crust cools slightly, let’s create that velvety chocolate filling. In your mixing bowl, beat the softened cream cheese until it’s completely smooth—no lumps allowed! This is where patience pays off. Add sugar gradually and beat until fluffy, about 2 minutes.
Now, eggs one at a time—fully incorporate each before adding the next. Too fast and your filling might crack later! Mix in vanilla and sour cream just until combined. Last comes the cocoa powder—sift it in if yours is clumpy. The batter should be thick but silky, like chocolate pudding you’d eat with a spoon (and yes, tasting is mandatory).
Step 3: Bake and Cool
Pour that gorgeous filling over your crust and smooth the top. Bake for 50-55 minutes—you’re looking for edges that are set but the center still has a slight jiggle (like Jell-O, not a wave pool).
When time’s up, turn off the oven and crack the door open with a wooden spoon. Let it cool gradually inside for 1 hour—this prevents dramatic temperature changes that cause cracks. Then, run a thin knife around the edge to loosen it (don’t skip this!) and let it cool completely on the counter. Resist poking it!
Step 4: Add Toppings and Chill
The grand finale! Once completely cool, spread cherry filling over the top—drain excess syrup so it’s not too wet. Pipe or dollop whipped cream around the edges if you’re feeling fancy, and maybe add a few fresh cherries for that “wow” factor.
Now the hardest part: refrigerate for at least 4 hours, preferably overnight. I know, the wait is torture! But trust me, this lets the flavors meld and gives you that perfect cheesecake texture. When you finally slice in? Pure black forest bliss.
Tips for Perfect Heavenly Black Forest Cheesecake Delight
Want your cheesecake to look as stunning as it tastes? After making this beauty dozens of times (tough job, I know), I’ve picked up some game-changing tricks that’ll take your dessert from good to “Oh my gosh, can I have the recipe?” level.
Keep it crack-free with a water bath
Don’t let cracks ruin your masterpiece! While some say they add character (my polite term for “I messed up but it still tastes good”), here’s how to avoid them: Place your springform pan in a larger roasting pan, then pour hot water around it until it comes halfway up the sides. The steam creates a gentle, even heat that prevents the dreaded cheesecake Grand Canyon. No roasting pan? A baking sheet with a dish of water on the rack below works too.
Drain those cherries like your cheesecake’s life depends on it
Nothing’s sadder than a soggy cheesecake top. When you open that can of cherry filling, spoon it into a strainer and let the excess syrup drain for at least 10 minutes. Better yet—pat the cherries gently with paper towels. You want all that glorious cherry flavor without the watery mess. (P.S. That syrup makes an amazing pancake topping, so don’t toss it!)
Go full-fat or go home
I know, I know—but this is dessert, not a diet food! That full-fat cream cheese and sour cream aren’t just there for fun. They give the cheesecake its luxurious mouthfeel and help prevent graininess. Skim versions add more water to the batter, which can lead to cracking and a less creamy texture. Treat yourself—your taste buds will thank you.
The room temp rule is sacred
Cold cream cheese equals lumpy batter equals sad bakers. I leave mine out overnight if baking in the morning! If you’re short on time, cut the blocks into 1-inch cubes—they’ll soften faster. And never use the microwave on full power to soften it; that’s how you end up with half-melted, half-cold chunks that refuse to blend smoothly.
Give it the time it deserves
I get it—when that heavenly scent fills your kitchen, waiting feels impossible. But rushing the cooling process is the fastest way to ruin your hard work. Let it cool gradually in the oven, then on the counter, then in the fridge. And that four-hour chill minimum? Non-negotiable. The flavors develop and the texture sets perfectly. Walk away—have dinner, watch a movie—then come back to perfection.
Variations and Substitutions
Listen, I’m all about making recipes work for your kitchen—because who hasn’t been halfway through baking only to realize they’re out of sour cream? (Raises hand dramatically.) Here are my tried-and-true swaps that keep this Heavenly Black Forest Cheesecake Delight delicious no matter what:
Need it gluten-free? No problem!
That chocolate cookie crust can easily go GF. I love using gluten-free Oreos (they taste identical!), or for something richer, try pulsing gluten-free chocolate wafer cookies. Even crushed gluten-free graham crackers mixed with cocoa powder work in a pinch. Just keep that butter ratio the same—it’s what makes the crust hold together.
Dairy-free? We’ve got options
For the filling, swap in your favorite dairy-free cream cheese (the block-style works better than tubs). Coconut yogurt makes a great stand-in for sour cream—just pick an unsweetened variety. And for the butter in the crust? Vegan butter or even coconut oil works beautifully. Pro tip: If using coconut oil, chill the crust an extra 10 minutes before baking to prevent sogginess.
Sour cream alternatives that work wonders
Out of sour cream? Greek yogurt adds wonderful tang (use full-fat for best results). I’ve even used buttermilk in a pinch—just reduce it to 3/4 cup since it’s thinner. Crème fraîche? Absolutely luxurious if you’ve got it. The key is maintaining that acidity to balance the sweetness.
Boozy cherries for grown-up indulgence
For special occasions, I spike my cherry topping with 1-2 tablespoons of kirsch (that classic Black Forest cherry liqueur). Just stir it into drained pie filling and let it sit 30 minutes before topping the cheesecake. No kirsch? A splash of amaretto or even bourbon adds lovely warmth.
Fresh cherry option when you’re feeling fancy
In summer when cherries are in season, I skip the canned filling altogether. Pit 2 cups fresh cherries, simmer with 1/4 cup sugar and 1 tablespoon lemon juice until syrupy (about 10 minutes), then cool completely. The flavor? Unreal. Just remember to remove the pits—biting into one is nobody’s idea of fun!
See? There’s always a way to make this recipe work with what you’ve got. The most important thing? That first blissful bite where chocolate and cherry sing together. However you get there is the right way!
Serving and Storing Heavenly Black Forest Cheesecake Delight
Okay, you’ve waited patiently (or maybe not so patiently) through all that chilling time—now let’s talk about enjoying your masterpiece! I’ve learned a few tricks over the years to make sure every slice looks as good as it tastes, and how to keep leftovers fresh (though in my house, “leftovers” is a rare concept with this cheesecake).
How to slice like a pro
First rule of cheesecake club: always use a hot knife! Run your sharpest knife under very hot water, dry it quickly, then make your first clean cut. Wipe the blade clean and repeat for each slice—this gives you those Instagram-worthy clean edges. For extra precision, I sometimes dip the knife in hot water between cuts. Pro tip: If serving to guests, slice it while still slightly chilled—it holds its shape better than at room temp.
Storage secrets for maximum freshness
Cover any leftovers (ha!) tightly with plastic wrap or store in an airtight container in the fridge. It’ll keep beautifully for up to 5 days—the flavors actually deepen a bit! If you want to freeze it, do so without the whipped cream and cherry toppings. Wrap individual slices or the whole cheesecake in plastic wrap, then foil, and freeze for up to 2 months. Thaw overnight in the fridge when ready to enjoy.
Reviving leftover cheesecake
If your refrigerated cheesecake seems a bit firm after a few days, let it sit at room temperature for about 15 minutes before serving. The texture will soften to that perfect creamy consistency again. For frozen slices, I sometimes microwave them at 50% power for 15-second bursts—just until slightly softened but still cool in the center.
Creative ways to serve leftovers
Day-old cheesecake is actually amazing crumbled over ice cream or yogurt—think cheesecake parfait! I’ve also layered chunks with fresh whipped cream and extra cherries in little glasses for an elegant trifle. My kids love when I sandwich small pieces between chocolate graham crackers for impromptu cheesecake cookies. Waste not, want not!
Remember, this cheesecake is at its absolute best within 3 days, but let’s be real—it rarely lasts that long in my house. Whether you’re serving it fresh from the fridge or enjoying the last precious slice days later, every bite of this Heavenly Black Forest Cheesecake Delight is pure bliss.
FAQ About Heavenly Black Forest Cheesecake Delight
I’ve gotten so many questions about this recipe over the years—here are the ones that pop up most often, along with all my hard-earned answers!
Can I use frozen cherries instead of pie filling?
Absolutely! Thaw 2 cups frozen cherries first, then simmer them with 1/4 cup sugar and a splash of lemon juice until they release their juices (about 10 minutes). Let it cool completely before topping your cheesecake. The flavor will be brighter and fresher than canned filling—just pat them dry like you would the canned ones to avoid excess moisture.
Help—my cheesecake cracked! How do I fix it?
First, don’t panic! Cracks happen to the best of us. The easiest fix? Cover it with extra whipped cream and cherries—no one will ever know. If you want to prevent future cracks, remember: gradual cooling is key (that oven-door-propped-open trick works wonders), and don’t overmix the batter after adding eggs. But honestly? Some of my most delicious cheesecakes have had cracks—they’re like flavor escape routes!
Can I make this cheesecake ahead of time?
You’re speaking my language! This cheesecake actually tastes better after 24 hours in the fridge. Make it up to 2 days ahead—just wait to add the cherry topping and whipped cream until an hour before serving. The crust stays crisp, and the flavors have time to become best friends. It’s my go-to move for dinner parties when I want to actually enjoy my guests instead of stressing in the kitchen.
Is the cocoa powder really necessary?
Technically? No. But for that authentic Black Forest flavor? Absolutely yes! The cocoa powder gives this cheesecake its deep chocolatey soul. If you’re in a real bind, you could melt 4 oz of dark chocolate into the batter, but you’ll need to reduce the sugar by 2 tablespoons since chocolate is sweeter than cocoa. Personally? I keep a spare tin of cocoa in my pantry just for this recipe—it’s that important.
What’s the best whipped cream substitute if I don’t have any?
In a pinch, you can use thawed whipped topping (like Cool Whip), but for a from-scratch alternative, try making stabilized whipped cream with mascarpone. Beat 1/2 cup cold mascarpone with 1 cup heavy cream and 2 tablespoons sugar—it holds up beautifully and tastes luxurious. Or go minimalist with just a dusting of cocoa powder over the cherries. But between us? Real whipped cream is worth the extra effort for that perfect cloud-like finish.
Got more questions? Slide into my DMs anytime—I love helping troubleshoot baking adventures! Remember, even “mistakes” usually taste amazing with this recipe. Happy baking!
Nutritional Information
Now, I’m not one to count calories when it comes to dessert (life’s too short!), but I know some folks like to keep track. Here’s the scoop on what you’re getting in each heavenly slice—just remember these are estimates since brands and ingredient sizes can vary:
- Calories: About 450 per serving (and worth every single one!)
- Fat: 28g (mostly from that glorious cream cheese and butter—the good stuff)
- Saturated Fat: 16g (hey, it’s cheesecake, not a salad)
- Carbohydrates: 45g (from the cookie crust, sugar, and cherries)
- Fiber: 2g (thank you, cocoa powder!)
- Sugar: 32g (it’s dessert, after all—no surprises here)
- Protein: 7g (from the eggs and dairy—bonus!)
A quick disclaimer: These numbers can shift depending on your specific ingredients. Using low-fat cream cheese? The numbers will drop. Added extra whipped cream? Well… let’s just say some things are better left unmeasured! The important thing is enjoying each decadent bite—nutrition info is just for general guidance, not guilt.
Pro tip: If you’re watching portions, slice the cheesecake into 16 smaller pieces instead of 12. You’ll still get that amazing flavor with slightly lighter stats. But between us? I always go for the full-size slice—life’s too short for skimpy cheesecake portions!
Share Your Creation!
Nothing makes me happier than seeing your versions of this Heavenly Black Forest Cheesecake Delight come to life! Seriously—I do a little happy dance every time a photo notification pops up. Whether it’s your first cheesecake or your hundredth, I’d love to celebrate your baking win with you.
Snap a pic of that gorgeous chocolate-and-cherry masterpiece before it disappears (because we both know it will!) and tag me on Instagram @CheesecakeObsessed. Seeing your creative twists—maybe you added chocolate shavings or arranged fresh cherries in a heart shape—gives me so much inspiration for new recipe ideas.
If you loved this recipe as much as I do, consider leaving a star rating and review on my blog. Your feedback helps other bakers know what to expect, and it helps me keep creating recipes that make people pause mid-bite in bliss. Plus, I read every single comment—often while nibbling on cheesecake leftovers myself!
Remember, there’s no “perfect” when it comes to homemade desserts—just delicious. Even if your crust crumbled a bit or your swirls didn’t turn out Instagram-perfect, I want to see it! Some of my favorite cheesecakes have been the “messy” ones that got devoured in minutes. Now go enjoy your creation—you’ve earned every bite!
Print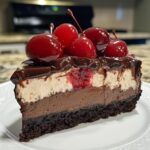
Heavenly Black Forest Cheesecake Delight: 1 Bite & You’re Hooked
- Total Time: 5 hours 15 minutes (includes chilling)
- Yield: 12 servings 1x
- Diet: Vegetarian
Description
A decadent black forest cheesecake combining rich chocolate and cherry flavors for a luxurious dessert.
Ingredients
- 2 cups chocolate cookie crumbs
- 1/2 cup melted butter
- 24 oz cream cheese, softened
- 1 cup granulated sugar
- 3 large eggs
- 1 tsp vanilla extract
- 1 cup sour cream
- 1/2 cup cocoa powder
- 1 cup cherry pie filling
- Whipped cream for topping
Instructions
- Preheat oven to 325°F (165°C).
- Mix cookie crumbs and butter, press into a 9-inch springform pan.
- Beat cream cheese and sugar until smooth.
- Add eggs one at a time, then vanilla and sour cream.
- Stir in cocoa powder until fully blended.
- Pour mixture over crust and bake for 50-55 minutes.
- Cool completely, then top with cherry filling and whipped cream.
- Chill for at least 4 hours before serving.
Notes
- Use room temperature cream cheese for smoother mixing.
- Let cheesecake cool gradually to prevent cracking.
- For extra richness, use dark chocolate cookie crumbs.
- Prep Time: 20 minutes
- Cook Time: 55 minutes
- Category: Dessert
- Method: Baked
- Cuisine: German
Nutrition
- Serving Size: 1 slice
- Calories: 450
- Sugar: 32g
- Sodium: 280mg
- Fat: 28g
- Saturated Fat: 16g
- Unsaturated Fat: 9g
- Trans Fat: 0g
- Carbohydrates: 45g
- Fiber: 2g
- Protein: 7g
- Cholesterol: 120mg
Keywords: black forest cheesecake, chocolate cherry dessert, German cake, no-bake cheesecake


