

There’s something magical about a Classic Chocolate Layer Cake that turns any ordinary day into a celebration. I’ve been baking this exact recipe for every birthday, anniversary, and “just because” occasion in our family for 15 years – and let me tell you, it never fails to disappear before the plates are cleared. What makes this cake so special? It’s that perfect balance of rich chocolate flavor and melt-in-your-mouth tenderness, all while being surprisingly simple to make with pantry staples.
I learned early on that the best chocolate cakes don’t need fancy ingredients or complicated techniques. My aha moment came when I realized boiling water is the secret weapon for that velvety crumb texture. Now, whether I’m baking for my kids’ school events or our neighborhood potlucks, this Classic Chocolate Layer Cake is always my first choice. The aroma alone – that deep cocoa scent wafting through the house – is enough to make everyone come running to the kitchen.
Trust me, once you try this recipe, you’ll understand why it’s earned a permanent spot in my recipe box (and why my husband calls it “emergency cake” for those days when only chocolate will do). It’s the kind of dessert that looks impressive but comes together as easily as boxed mix – only about a hundred times more delicious.
Why You’ll Love This Classic Chocolate Layer Cake
This isn’t just any chocolate cake—it’s the kind that makes people sneak extra slices when they think no one’s looking. Here’s why it’s become my most-requested dessert:
- Unbelievably moist texture – That boiling water trick? It creates the softest, most tender crumb you’ll ever taste. No dry cake here!
- Foolproof to make – One bowl, simple ingredients, and no fancy techniques. Even my 10-year-old can mix this batter.
- Crowd-pleasing flavor – Deep chocolate taste without being overly sweet. Perfect for both kids and grown-up chocolate lovers.
- Always turns out right – I’ve made this in five different ovens over the years, and it’s never failed me once.
- Versatile for any occasion – Dress it up with fancy frosting for birthdays or serve it plain with powdered sugar for weeknight treats.
The best part? You probably have everything you need in your pantry right now. Go ahead—preheat that oven!
Ingredients for Classic Chocolate Layer Cake
Now, let’s talk ingredients – the building blocks of our perfect chocolate cake. I’m pretty particular about some of these (learned the hard way!), so pay attention to my notes. Here’s what you’ll need to gather:
- 2 cups all-purpose flour – Spoon it into the measuring cup and level it off. Packed flour gives you a dense cake, and nobody wants that.
- 2 cups granulated sugar – Yes, two full cups. This balances the cocoa’s bitterness perfectly.
- 3/4 cup unsweetened cocoa powder – Use the good stuff here. I prefer natural cocoa for its classic flavor.
- 2 tsp baking powder + 1 1/2 tsp baking soda – Don’t mix these up! The combo creates perfect rise.
- 1 tsp salt – Trust me, it makes all the flavors pop.
- 1 cup whole milk – Low-fat works in a pinch, but whole milk gives that rich texture we love.
- 1/2 cup vegetable oil – I use canola, but any neutral oil works. Butter substitutes change the texture.
- 2 large eggs – Room temperature, please! Cold eggs don’t incorporate as well.
- 2 tsp vanilla extract – The real stuff, not imitation. It matters.
- 1 cup boiling water – This is our secret weapon! Don’t skip it – the batter will look thin, but that’s normal.
See those notes next to some ingredients? That’s 15 years of trial and error talking. Stick with these exact measurements for your first try – I’ll tell you about possible swaps later once you’ve mastered the original.
Equipment You’ll Need
Here’s the beautiful part – you don’t need fancy gadgets to make this Classic Chocolate Layer Cake shine. Just a few trusty tools from your kitchen will do the trick:
- Two 9-inch round cake pans – The standard ones with about 1.5-inch sides work perfectly. I’ve had mine so long they’re practically family!
- Wire cooling rack – Essential for letting those layers breathe after baking. No rack? Clean oven racks work in a pinch.
- Sifter or fine mesh strainer – For getting rid of lumps in dry ingredients. My grandma swore by this step.
- Large mixing bowl – Big enough to hold all that glorious batter without spills.
- Electric mixer or sturdy whisk – Either works fine, though I love my hand mixer for quick blending.
- Rubber spatula – For scraping every last bit of batter into the pans. Waste not, want not!
- Cake tester or toothpicks – My personal favorite? A dry spaghetti noodle – it works just as well!
That’s it! No stand mixer required (though if you have one, go ahead and use it). The simpler the tools, the more magical it feels when that perfect cake emerges from the oven.
How to Make Classic Chocolate Layer Cake
Alright, let’s get baking! I’ve made this cake so many times I could probably do it in my sleep, but I’ll walk you through each step carefully. The process is simple, but there are a few tricks that make all the difference between good and oh-my-goodness amazing chocolate cake.
Preparing the Cake Batter
First things first – preheat that oven to 350°F (175°C). While it’s heating up, let’s tackle the dry ingredients. Grab your biggest mixing bowl and sift together the flour, sugar, cocoa powder, baking powder, baking soda, and salt. I know sifting seems old-fashioned, but trust me – it prevents lumps and makes the cake extra light.
Now for the fun part! Make a well in the center of your dry ingredients and pour in the milk, oil, eggs, and vanilla. Start mixing on medium speed – you’ll see this thick, chocolaty batter come together beautifully. Keep beating for a full 2 minutes (set a timer!). This develops the structure and gives you that perfect cake texture.
Here comes the magic: slowly pour in that cup of boiling water while mixing. The batter will suddenly look super thin – don’t panic! This is exactly what we want. It might seem strange, but this watery batter bakes up into the moistest cake you’ve ever tasted. Just give it one last gentle stir with your spatula to make sure everything’s incorporated.
Baking and Cooling
Divide that liquid gold (okay, liquid chocolate) evenly between your prepared pans. I like to use a measuring cup to pour – it helps me get the amounts just right. Pop them in the oven and set your timer for 30 minutes.
Now, here’s where patience comes in. No peeking for at least 25 minutes! Around the 30-minute mark, start testing with a toothpick. It should come out with just a few moist crumbs – no wet batter. If it needs more time, check every 2 minutes. Mine usually takes exactly 33 minutes, but every oven’s different.
When it’s done, let the cakes cool in their pans for exactly 10 minutes – no more, no less. This lets them set enough to handle but keeps them from drying out. Then run a knife around the edges and flip them onto your wire rack to cool completely. I know it’s tempting, but don’t frost warm cakes! Wait until they’re completely cool, or your frosting will melt right off.
See? Easy as… well, cake! Now comes the best part – decorating and eating. But we’ll get to that soon enough.
Tips for Perfect Classic Chocolate Layer Cake
After baking this cake more times than I can count, I’ve picked up some tricks that take it from good to “can I have the recipe?” amazing. These are my tried-and-true secrets for chocolate cake success:
Swap water for hot coffee – Sounds crazy, but trust me on this one! The coffee deepens the chocolate flavor without making it taste like coffee. Just use freshly brewed hot coffee instead of boiling water. My neighbor thought I’d used some fancy chocolate when I tried this trick – it’s that good.
Room temperature ingredients matter – I know I mentioned the eggs earlier, but it’s worth repeating. Cold ingredients don’t blend as smoothly, which can affect your cake’s texture. Take everything out about 30 minutes before you start baking.
The toothpick test isn’t foolproof – Here’s my baker’s confession: I’ve overbaked cakes relying solely on the toothpick test. The edges might look done while the center’s still wet. Check multiple spots, and look for the cake pulling slightly away from the pan’s sides.
Grease pans like a pro – My foolproof method? Butter the pans, line the bottoms with parchment circles, then butter the parchment. Dust with cocoa powder instead of flour to avoid white specks on your chocolate cake. Comes out perfect every time!
Let cakes cool upside down – This little trick helps prevent doming. Once you flip the cakes onto racks, leave them upside down while cooling. They’ll stay nice and flat for easy stacking.
Freeze layers before frosting – Wrap cooled cake layers in plastic and freeze for 30 minutes before assembling. Cold cakes are sturdier and won’t crumble when you frost them. Plus, the frosting stays where you put it!
Remember – the first time might not be perfect, and that’s okay! My very first attempt at this cake looked like a chocolate pancake. But once you get these tips down, you’ll be making bakery-quality chocolate layer cakes like a pro.
Frosting and Serving Suggestions
Now for the fun part – dressing up our beautiful chocolate layers! I’ve experimented with countless frostings over the years, but these are my absolute favorites for this Classic Chocolate Layer Cake. Each one brings something special to the party.
My Go-To Chocolate Frosting
This rich, fudgy frosting is what I use 90% of the time – it spreads like a dream and tastes like heaven. You’ll need:
- 1 cup (2 sticks) softened butter
- 3 1/2 cups powdered sugar
- 3/4 cup cocoa powder
- 1/3 cup heavy cream (more if needed)
- 2 tsp vanilla extract
- Pinch of salt
Cream the butter first – really whip it until it’s pale and fluffy. Then sift in the powdered sugar and cocoa gradually while mixing. The heavy cream goes in last to get that perfect spreading consistency. Pro tip: If your kitchen’s warm, pop the frosted cake in the fridge for 15 minutes to set the frosting before serving.
Quick Decorating Ideas
You don’t need pastry chef skills to make this cake look stunning. Here are my easy-peasy decorating tricks:
- Cocoa dusting – Just before serving, dust the top with cocoa powder through a fine sieve. Looks fancy, takes 2 seconds!
- Chocolate shavings – Run a vegetable peeler along a chocolate bar for instant curls. Sprinkle them over the frosted cake.
- Berry crown – Arrange fresh raspberries or strawberries around the top edge. The red against dark chocolate? Gorgeous!
- Simple drizzle – Melt some chocolate chips with a bit of cream and zigzag it over the cake with a spoon.
Serving Sizes and Presentation
This cake serves 12-16 people depending on how generous you’re feeling! I usually cut it into 12 wedges for dessert portions. For parties, I’ll sometimes make smaller slices – you can get up to 20 servings if you’re serving other desserts too.
Presentation tip: Use a cake stand if you have one – it makes even a simply decorated cake look special. No stand? A pretty plate works just fine. And here’s my secret – warm your knife under hot water before slicing for perfectly clean cuts every time.
The best part? This cake tastes even better the next day as the flavors meld. If you can resist eating it all at once, that is!
Storing Classic Chocolate Layer Cake
Here’s the good news – if by some miracle you have leftovers (it’s rare in my house!), this cake keeps beautifully. I’ve learned a few tricks over the years to keep it tasting fresh and delicious for days after baking.
Room temperature is key – I know it’s tempting to pop everything in the fridge, but chocolate cake actually dries out faster when refrigerated. Instead, store your frosted cake in an airtight container at room temperature. My trusty cake carrier works perfectly, but a large bowl with a tight-fitting lid does the trick too.
How long does it last? The cake stays moist and tasty for about 3 days stored properly. After that, it’s still safe to eat but starts losing that perfect texture. I like to write the bake date on a sticky note attached to the container – no guessing games!
What about cut slices? If you’ve already cut into the cake, press plastic wrap directly onto the cut sides before putting it in the container. This prevents drying better than just covering the top. Learned this trick after one too many dry cake edges!
Freezing for later – This cake freezes like a dream! Wrap unfrosted layers tightly in plastic wrap, then foil, and freeze for up to 3 months. Thaw at room temperature before frosting. You can even freeze individual slices for quick treats – just microwave for 15 seconds when that chocolate craving hits.
One last tip – if your kitchen gets really warm, you can refrigerate the cake for short periods, but let it come back to room temperature before serving. That way you get the best texture and flavor. Now go enjoy every last crumb!
Nutritional Information
Okay, let’s talk numbers – but don’t let them scare you away from enjoying every delicious bite of this Classic Chocolate Layer Cake! These estimates are based on my exact recipe, but remember – your actual numbers might vary slightly depending on specific brands and measurements. Here’s the breakdown per slice (assuming you cut the cake into 12 generous portions):
- Serving Size: 1 slice (1/12 of cake)
- Calories: 380
- Total Fat: 14g (Saturated Fat: 3g)
- Cholesterol: 35mg
- Sodium: 320mg
- Total Carbohydrates: 58g (Dietary Fiber: 3g, Sugars: 35g)
- Protein: 5g
A few important notes: These numbers don’t include any frosting (because let’s be real, who measures frosting perfectly?). If you’re watching your sugar intake, you can reduce it slightly by using dark cocoa powder (it’s less sweet) or cutting the sugar by 1/4 cup – though I can’t promise the same amazing texture.
My philosophy? Life’s too short to stress over every calorie in homemade cake. Enjoy a slice, savor every bite, and maybe take an extra walk tomorrow. After all, some things – like this perfect chocolate cake – are worth every delicious morsel!
FAQs About Classic Chocolate Layer Cake
After years of baking this cake and sharing it with friends, I’ve heard every question imaginable! Here are the answers to the ones that come up most often – straight from my messy, chocolate-stained recipe notebook:
Can I use buttermilk instead of regular milk?
Absolutely! Buttermilk makes the cake extra tender and adds a subtle tang. Just replace the whole milk with the same amount of buttermilk and reduce the baking soda to 1 teaspoon (the acidity in buttermilk reacts with it). My Southern aunt swears this is the secret to her famous version!
How can I make this cake gluten-free?
I’ve had great success using a 1:1 gluten-free flour blend (look for one with xanthan gum already added). The texture comes out nearly identical – maybe just a tad more delicate. My celiac friend couldn’t tell the difference when I surprised her with it last birthday!
Why does the batter look so thin?
Don’t panic! That watery batter is exactly what gives this cake its incredible moisture. The boiling water hydrates the cocoa powder and creates steam pockets during baking. I know it seems wrong – my first time making it, I nearly dumped it out thinking I’d messed up. But trust the process!
Can I bake this in a 9×13 pan instead?
You sure can! Grease the pan well and bake at the same temperature for about 40-45 minutes. The cake will be slightly shorter but just as delicious. This is actually how I make it for potlucks – easier to transport and serve straight from the pan.
My cake sunk in the middle – what went wrong?
Oh honey, we’ve all been there! Usually it means either: 1) The oven door was opened too early (resist peeking for at least 25 minutes!), 2) The baking powder/soda was old, or 3) The cake wasn’t quite done in the center. Next time, try the toothpick test in multiple spots and make sure your leaveners are fresh.
Got more questions? Drop them in the comments below – I’m happy to help troubleshoot your baking adventures! After all, every chocolate cake mishap is just a learning opportunity… and an excuse to try again.
Ready to Bake?
Well, there you have it – everything I’ve learned about making the perfect Classic Chocolate Layer Cake over hundreds of batches and countless celebrations. Now it’s your turn to create some chocolate magic in your own kitchen! I can’t wait for you to experience that first bite of warm, rich cake straight from the oven.
Here’s my challenge to you: Bake this cake this week. Yes, even if there’s no special occasion! Surprise your family on a random Tuesday or treat your coworkers to something homemade. I promise, once you taste that first slice, you’ll understand why this recipe has been my go-to for so many years.
When you do make it (and I know you will!), come back and tell me all about your baking adventure. Did you try the coffee trick? How did your family react? Snap a photo of your masterpiece – even if it’s not perfect, I want to see it! There’s nothing I love more than hearing how this cake becomes part of your own family traditions.
One last thing before you grab your mixing bowls: Don’t stress about making it flawless. Some of my best kitchen memories come from “imperfect” cakes – the lopsided birthday cake we decorated with extra sprinkles to hide the tilt, or the time I forgot the salt but we ate it anyway with extra frosting. It’s all part of the joy of homemade baking.
Now go preheat that oven, dust off your favorite cake pans, and let’s get baking! Your future self (and everyone lucky enough to get a slice) will thank you.
Print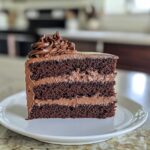
15 Years of Perfect Classic Chocolate Layer Cake Secrets
- Total Time: 50 minutes
- Yield: 1 (9-inch) 2-layer cake 1x
- Diet: Vegetarian
Description
A rich and moist chocolate layer cake perfect for any celebration. Easy to make with simple ingredients.
Ingredients
- 2 cups all-purpose flour
- 2 cups granulated sugar
- 3/4 cup unsweetened cocoa powder
- 2 tsp baking powder
- 1 1/2 tsp baking soda
- 1 tsp salt
- 1 cup whole milk
- 1/2 cup vegetable oil
- 2 large eggs
- 2 tsp vanilla extract
- 1 cup boiling water
Instructions
- Preheat oven to 350°F (175°C). Grease and flour two 9-inch round cake pans.
- In a large bowl, sift together flour, sugar, cocoa powder, baking powder, baking soda, and salt.
- Add milk, vegetable oil, eggs, and vanilla. Beat on medium speed for 2 minutes.
- Stir in boiling water. The batter will be thin.
- Divide batter evenly between the prepared pans.
- Bake for 30-35 minutes or until a toothpick inserted comes out clean.
- Cool in pans for 10 minutes, then transfer to a wire rack to cool completely.
- Frost with your favorite chocolate frosting and serve.
Notes
- Store leftovers in an airtight container at room temperature for up to 3 days.
- For a taller cake, double the recipe and use three 9-inch pans.
- Replace boiling water with hot coffee for a deeper chocolate flavor.
- Prep Time: 15 minutes
- Cook Time: 35 minutes
- Category: Dessert
- Method: Baking
- Cuisine: American
Nutrition
- Serving Size: 1 slice (1/12 of cake)
- Calories: 380
- Sugar: 35g
- Sodium: 320mg
- Fat: 14g
- Saturated Fat: 3g
- Unsaturated Fat: 9g
- Trans Fat: 0g
- Carbohydrates: 58g
- Fiber: 3g
- Protein: 5g
- Cholesterol: 35mg
Keywords: chocolate cake, layer cake, homemade dessert, easy baking


