
Back to School Cookies: 10 Irresistible Treats for Kids
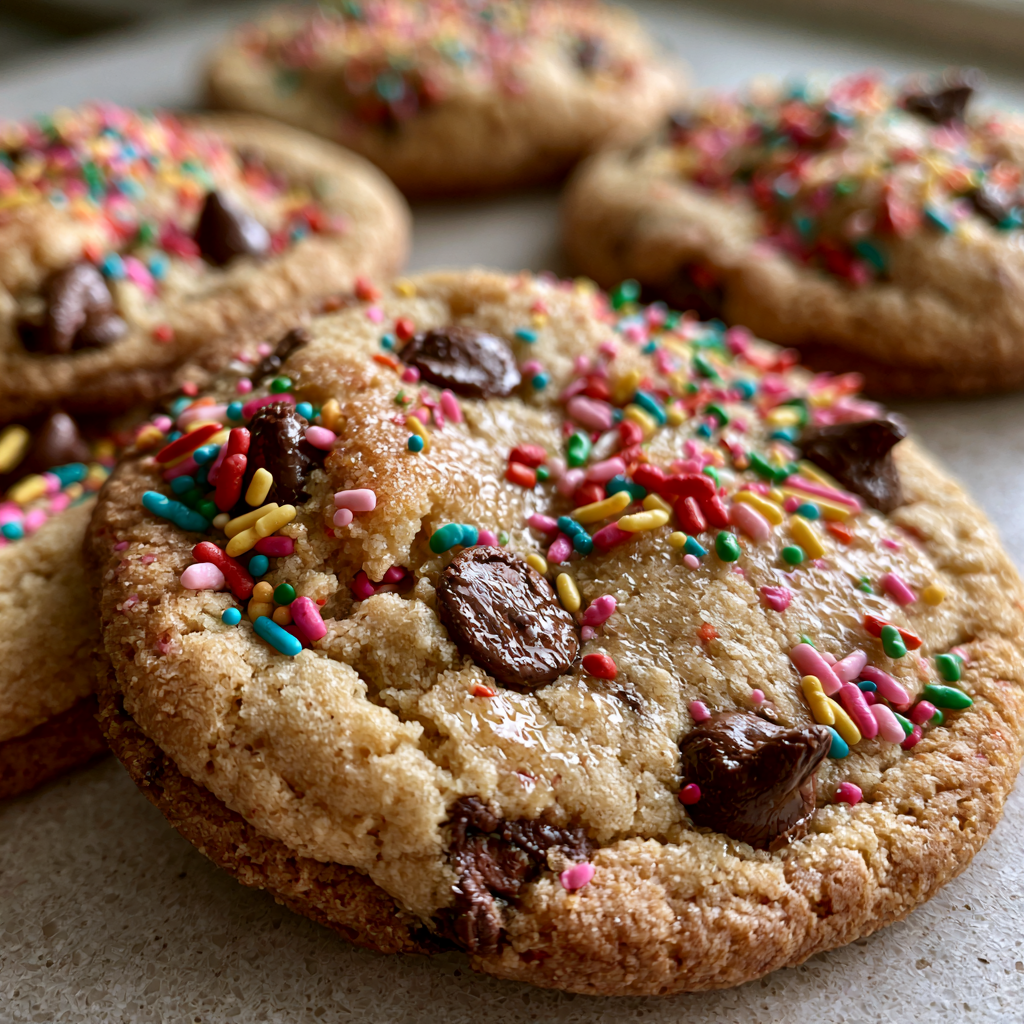
Back to School Cookies are the perfect way to welcome a new school year! These delightful treats not only bring a smile to your kids’ faces but also add a touch of sweetness to their busy days. The visual appeal of these cookies, adorned with colorful sprinkles and chocolate chips, makes them a hit at lunchboxes and after-school gatherings. Are you ready to make snack time exciting again? With these cookies, you can celebrate new beginnings, academic achievements, and the joy of learning.
Imagine the soft, chewy texture of each cookie, melting in your mouth with every bite. The crisp edges provide a satisfying crunch while the center remains moist and tender. As your kids take a bite, they’ll experience a burst of flavor, from the rich chocolate to the sweetness of the sprinkles. The colors pop – bright reds, yellows, blues, and greens – making these cookies not just a treat but a delightful centerpiece for any back-to-school celebration.
Celebrating the return to school is all about creating joyful memories. The pride of a new grade, the excitement of meeting new friends, and the anticipation of new adventures are all wrapped up in these delicious cookies. Whether you’re packing them in lunchboxes or serving them as after-school snacks, these cookies are sure to be a favorite.
When it comes to textures, these cookies deliver a fantastic experience. The soft center contrasts nicely with the crisp edges, creating a delightful mouthfeel. The flavors are a medley of sweetness, with the chocolatey goodness complementing the sugary cookie base. The colorful sprinkles add not only sweetness but also a fun visual element that kids adore.
Back to school cookies are ideal for various occasions, from classroom treats to family gatherings. They easily fit into lunchboxes, providing a wholesome snack that kids will love. These cookies also make excellent party favors for back-to-school parties, allowing kids to share their excitement with friends. Plus, their portable nature ensures that they can be enjoyed anytime, anywhere.
With the rise of social media, these cookies are not just a treat; they are also Instagram and Pinterest-friendly. Their vibrant colors and delightful presentation make them perfect for sharing online. Imagine your kids proudly showcasing their back-to-school cookies on social platforms, creating buzz among friends and family.
What makes this Back to School Cookies recipe stand out is its efficiency. You can whip up a large batch that yields 10 dozen cookies, making it perfect for parties or meal prep. The method is beginner-friendly, ensuring that even novice bakers can create delicious treats without any hassle. Plus, the customization options are endless. You can add different flavors, colors, or decorations to suit your child’s preferences.
The recipe is designed to be efficient, yielding a whopping 10 dozen cookies. This means you can prepare them in bulk, ensuring you have plenty for lunchboxes and after-school snacks. The simple method allows even beginners to achieve perfect cookies every time. And with so many decoration ideas, from chocolate drizzle to festive sprinkles, you can personalize them for any occasion.
In summary, these cookies are easy to make, and they yield a satisfying amount that will keep your kids happy all week. With a prep time of just 15 minutes and a cook time of 10-12 minutes, you’ll have fresh cookies ready in no time. They are perfect for parties, gifting, or simply enjoying at home.
What Are Back to School Cookies?
Back to School Cookies are fun, colorful treats made specifically to celebrate the return to school. They are soft, chewy cookies typically packed with chocolate chips and adorned with vibrant sprinkles. This trending dessert has become popular for its ability to bring joy and excitement to kids as they transition back into the school routine. With their delightful flavors and appealing appearance, these cookies are perfect for lunchboxes, after-school treats, or even classroom celebrations.
Why You Will Love These Back to School Cookies
- Easy to prepare in bulk: You can quickly make a large quantity, which is perfect for busy families.
- Customizable colors and themes: Change up the sprinkles or chocolate chips to match your child’s favorite colors or school spirit.
- Perfect for party presentation: Their vibrant appearance makes them ideal for dessert tables or snack trays.
- Kid-friendly and mess-free: These cookies are easy for kids to handle and enjoy without making a mess.
- Ideal for selling or gifting: With their appealing look, they can be packaged and sold at bake sales or given as gifts.
Ingredients You Need
- 1 cup (200g) granulated sugar: Sweetness and structure.
- 1 cup (220g) brown sugar, packed: Adds moisture and a rich flavor.
- 1 cup (226g) unsalted butter, softened: Essential for a rich, creamy texture.
- 2 large eggs: Acts as a binder for the ingredients.
- 2 teaspoons vanilla extract: Enhances the overall flavor.
- 3 cups (360g) all-purpose flour: Provides structure and body to the cookies.
- 1 teaspoon baking soda: Helps the cookies rise.
- 1 teaspoon salt: Balances the sweetness.
- 2 cups (340g) chocolate chips: The star ingredient for chocolate lovers.
- 1 cup (150g) colorful sprinkles: Adds a fun and festive touch.
How to Make Back to School Cookies Step by Step
- Bake the cookies: Preheat your oven to 350°F (175°C). In a large bowl, cream together the granulated sugar, brown sugar, and softened butter until light and fluffy.
- Crumble and mix: Add the eggs and vanilla extract, mixing until well combined. In a separate bowl, whisk together the flour, baking soda, and salt. Gradually add the dry ingredients to the wet mixture.
- Shape into balls: Stir in the chocolate chips and colorful sprinkles. Using a cookie scoop or your hands, form the dough into balls and place them on a baking sheet lined with parchment paper.
- Chill for firmness: Refrigerate the cookie dough balls for about 15 minutes to prevent spreading during baking.
- Insert sticks: If desired, you can insert lollipop sticks into the dough balls for a fun twist.
- Dip into coating: Bake the cookies for 10-12 minutes or until the edges are golden brown. Let them cool on the baking sheet for a few minutes before transferring to a wire rack.
- Decorate creatively: Once cooled, you can decorate with additional sprinkles or melted chocolate if you wish.
Pro Tip: Chill the cookie dough before baking to help maintain their shape and prevent spreading.
Expert Tips for Best Results
- Use fine crumbs: Ensure all ingredients are well combined for a smooth texture.
- Avoid too much frosting: Keep the cookie dough balanced for the best flavor.
- Keep coating temperature stable: This ensures even baking and a consistent texture.
- Work in batches: This prevents overcrowding in the oven.
- Use deep cups for dipping: This makes it easier to coat the cookies evenly.
- Tap gently for a smooth finish: Helps to remove excess flour and create a polished look.
Variations and Substitutions
- Chocolate cake pops version: Swap out some flour for cocoa powder for a chocolatey twist.
- Red velvet variation: Add cocoa powder and red food coloring for a festive spin.
- Gluten-free cake option: Use a gluten-free flour blend to make these cookies suitable for gluten-sensitive kids.
- Dairy-free frosting option: Substitute butter with coconut oil or a vegan butter alternative.
- Lemon or strawberry flavors: Incorporate lemon zest or strawberry puree for a fruity twist.
How to Serve and Store
Serving: These cookies are perfect for lunchboxes, gift boxes, or as dessert at parties.
Storage: Store in an airtight container at room temperature for up to 1 week.
Freezing: Yes, these cookies can be frozen for up to 1 month; simply thaw before serving.
Reheating: Not required – they are delicious at room temperature!
Frequently Asked Questions
How long do back to school cookies last?
They last up to 7 days when stored in an airtight container at room temperature.
Can I freeze back to school cookies?
Yes, you can freeze them for up to one month. Just make sure to place them in an airtight container.
Why are my cookies spreading?
Cookies may spread if the dough is too warm or if there is too much butter. Make sure to chill the dough before baking.
Can I make them ahead of time?
Yes, you can prepare the cookie dough a couple of days in advance and bake them when you’re ready.
What coating works best?
Candy melts or chocolate provide a smooth and tasty coating for these cookies.
Can I sell these cookies?
Absolutely! They are popular and can be easily sold at bake sales or local markets.
In conclusion, Back to School Cookies are not just a delicious treat; they are a fun way to celebrate the return to school. Their visual appeal and easy preparation make them an excellent choice for both kids and parents alike. Try making these cookies today, and share your results with your friends and family!
Print
Back to School Cookies: 10 Irresistible Treats for Kids
Description
These delightful back to school cookies are soft, chewy, and packed with flavors that kids love. Perfect for lunchboxes or after school snacks!
Ingredients
- 1 cup (200g) granulated sugar
- 1 cup (220g) brown sugar, packed
- 1 cup (226g) unsalted butter, softened
- 2 large eggs
- 2 teaspoons vanilla extract
- 3 cups (360g) all-purpose flour
- 1 teaspoon baking soda
- 1 teaspoon salt
- 2 cups (340g) chocolate chips
- 1 cup (150g) colorful sprinkles
Instructions
- Preheat your oven to 350°F (175°C) and line a baking sheet with parchment paper.
- In a large mixing bowl, cream together the granulated sugar, brown sugar, and softened butter until light and fluffy.
- Add in the eggs one at a time, mixing well after each addition. Stir in the vanilla extract.
- In another bowl, whisk together the flour, baking soda, and salt.
- Gradually add the dry ingredients to the wet ingredients, mixing until just combined.
- Fold in the chocolate chips and colorful sprinkles.
- Drop rounded tablespoons of dough onto the prepared baking sheet, spacing them about 2 inches apart.
- Bake in the preheated oven for 10-12 minutes or until the edges are lightly golden.
- Remove from the oven and let the cookies cool on the baking sheet for 5 minutes before transferring to a wire rack to cool completely.
Notes
- Feel free to substitute chocolate chips with your favorite mix-ins like nuts or dried fruit.
- For a softer cookie, do not overbake.
- These cookies can be stored in an airtight container for up to a week.
Nutrition
- Serving Size: 1 cookie
- Calories: 150
- Sugar: 10
- Sodium: 50
- Fat: 7
- Saturated Fat: 4
- Unsaturated Fat: 2
- Trans Fat: 0
- Carbohydrates: 20
- Fiber: 1
- Protein: 2
- Cholesterol: 30
Keywords: back to school cookies, soft cookies, chocolate chip cookies, colorful sprinkle cookies, easy cookie recipe, after school snacks